Friday 16 September 2016
Returning soon....
I love to blog! But this is a renovation blog, and for the last few years, we have had nothing to report, while busy off getting married and all that jazz, but we are now in a position to continue renovations with the next project... the bathroom! Stay tuned for October 2016!
Friday 12 December 2014
Crafty crafty fun times
Hi guys! How are you all! Christmas fast approaches so it's time to share some little craft projects that you might be able to hi-jack for some last-minute DIY gifts.


But first: our inspiration. Things Squirrel loves: yellow home accessories and DENIM! Oh ye gads I am so excited that denim and chambray are so incredibly 'in' at the moment. From these, we take today's projects! First up, denim project!
You will need: A 11 litre tub, Rit Dyes, Rubber Bands, Gloves, White tea towels. For one dye and the rest, total cost is $21.00 to make 10 tea towels! (Coles, Lincraft, $2 shop).
And what we are going to do is SHIBORI! There is a great tutorial here but basically - its a variation on tie-dying where you place 'things' into the fabric and tie it up so dye doesn't reach these areas. Above is an example of the different techniques I used. My favorite by far though was actually just dip dying the tea towels!
This was my set up - pegs on the line and holding the tea towels. I used the height adjuster on the clothes line to lower/pull the tea towel out of the dye slowly giving us an ombre effect. I loved this so much.
After each batch was done (I would leave Shibori ones in the dye for 45 minutes, and the dip-die 15 minutes for each band) I would hang and rinse these with cold water. I then ironed these, and machine washed them...and ironed again. Some of the directions I read online seemed to indicate that ironing it the first time would help to set the dye. Unforch, this didn't entirely work. I need to research this bit of it a bit more - perhaps adding salt? I followed my instructions on the dye but you never know. I did wash them all together with detergent and one of the towels was totally blue? Hmm.
Anyway.
This was a selection of the towels after the first iron. The only thing that changed was that any towels that had crisp white are now a light blue, and the ombre is much smoother, and less jagged. I like and also not like this.
As an example...
I then bundled these up, and they are ready to go as a cute handmade pressie! I would just love to know how to lock the colour a bit more? Suggestions very much appreciated!
NEXT PROJECT!
I've been eyeing off this yellow 'hello' from my local Bed Bath N Table for months - it's so FUN! And happy and welcoming! And the font is gorg. It is, however, $40. Which is perhaps a little rich... especially when you are on the sort of financial diet where you ask yourselves 'do we even need to buy bread? Couldn't we just use paper folded over a few times then toasted?'.
On a trip to Spotlight for, coincidently, the ribbon to finish off the above project, I came across this
for $4.95! (And can be found at any Kaisercraft stockist!). Now you're speaking my language.
I rounded up my supplies - roller and tray, paint leftover from the table makeover, and my trusty mouse sander. First I hit the whole thing lightly with the sander - especially the tops of the 'h', and 'l's as they were a little too straight for my liking. I used the brush to get all the inside and outside edges, before hitting the front and back with the roller - wanting to get a smooth finish like the table.
As with the table, (using yellow paint on a wooden finish) this takes quite a few coats- 4 or 5 maybe? It's just getting that coverage and depth of colour you want. Once you're happy with the colour, chuck a clear coat over the top for protection and a bit of gloss, set outside in the sun to cure and dry and you're done!
Now is just deciding where this will live - in the bookcase that you see on the way in, or on the entertainment unit with a few decorative friends? Oh I can't wait to show you some of the things we are getting for Christmas bloggers, some typography-inspired fun, and some more yellow pops for the kitchen!
And that's it! What have you been making for Christmas, web-o-sphere?
Sunday 9 November 2014
But if I did they'd have a Samurai

WELL HAI THERE!
Bowie welcomes you, bloggers. In a casual and informal way.
After what was a lengthy delay between posts we are now back in full swing here at Squirrel & Puffin! Over the long weekend we have achieved SO MUCH!! Puffin, with the assistance of Mr Bennett, concreted both the driveway and the area out the back - see?

.jpg)
Since this was done so supremely by the gang, it was time for Squirrel and Badger to step in and do their bit!

But first - new shoes! Girls love new shoes and none more than this girl when they are new work boots as an engagement gift from the Badger! This made the digging soooo much earlier. And they're so comfy. Why aren't girls shoes this comfortable?

After a trip to Bunnings, our other home, we tested out the layout for the sprinklers to cover the front yard area. In the first test, I managed to shoot the sprinkler directly into my face. Bowie laughed from his front row posie in the window.

Then the absolute worst bit. Digging the trenches. So many thoughts at this point, like - 'no wonder so many people died in the war', and 'Pharrell clearly wasn't digging trenches when he wrote "Happy"'. So much sweating. So much wishing for death.

Then we laid three strips of conduit, and one length of poly pipe - this lot covers the sprinklers and the conduit is for electrical cable for the boxes and then lights that will one day go in there.

Luckily for Badger and I, Mumma Bear was on the job for snacks and lunch, providing goodness from the Darley Bakehouse. The remainder of the afternoon was filling the trenches back in and raking out the surface. This was buggering work. There were still a few things for us to complete though - the replacement of one dodgy sprinkler, the removal of the dodgy solenoid and putting a brick box around the valve. Which huzzuh - means we got back to it the next day!!!
Our first mission was replacing the solenoid - but since the tap proved also kinda dodgy, this filled the pit with water. So much water. And threatened to send dirty pit water (not to be confused with #dirtystreetpies) into the house. So the wheel barrow came out, with an ice cream bucket, and this girl had to keep scooping the water out while it continued to fill and badger attempted to re-fit the valve. The pit continued to fill and fill and I started to feel like...

Harry and Dumbledore, when they were in the cave drinking the potion and it never seemed to end. You know how it is. But ultimately it did end, and we moved on. We bricked up this area, and started leveling it out.

On Puffin and Puffins Dads suggestion, we raked one way, and set about mixing in the grass and friends!

Friends of seeds.

Grass seeds are BLUE?! Did you see that coming?

Then we raked back ACROSS the original direction, thus distributing it beautifully, and we set the sprinklers a-going and BOOM!
Your front yard is:
concreted
leveled
plumbed and
had new grass laid.
There was quite a bit of work done in the concreting realm that Squirrel wasn't around for so one of our upcoming blogs will be written by our guest blogger, PUFFIN!!
Monday 27 October 2014
My anaconda don't...
Helllloooooo possums!
How are we all? Good, Good. Apologies for the absence from the airwaves, uni became increasingly important in the lead up to finishing (yay!) and we have had some other exciting news... Puffin and Squirrel are now engaged!


How are we all? Good, Good. Apologies for the absence from the airwaves, uni became increasingly important in the lead up to finishing (yay!) and we have had some other exciting news... Puffin and Squirrel are now engaged!
Puffin and Squirrel being adorable.
A selection of some of the flowers we got from our friends and family!
Puffin surprised Squirrel with a weekend away in the blissful Palm Cove in North Queensland and popped the question after a day of snorkeling on the Great Barrier Reef and an amazing dinner, and of course, Squirrel said yes! Rather than starting an additional wedding blog, I will occasionally post here!
And of course, we continue to work on the house, now turning out attention firmly to the garden. Here are some progress shots.
Very very early on....
After installation of pear trees and boxes (and of course new front door etc) No filter on this photo, it was just that much of an amazing day.
And today! After the ripping out of the front lawn!
So since last time we have.... Rotary-hoed the front lawn (with thanks to Badger for the use of this and his help!), then raked it, then got all the rough-ness out, then further dug out a few sections including the driveway. As you can see in the left side of the photo, we have edged off and prepared for concreting of an extra corner of the driveway. Both of our cars fit up the end, but it meant that I had to cut the corner of the lawn with my car each day. If we are going to put new lawn down, we didn't want to bugger it up, hence concrete. Puffin made an excellent point on this, in that this should also add value to the house, as it makes it a double driveway and who knows, maybe one day we will add a car port.
So far, this has cost less than $60 in reinforced steel, crushed rock and labor - (Big thanks here go to Mitch, Tab, Bennett, Neesha and of course Wayne and Linda for their help on what turned into a spontaneous working bee!)
There has also been a lot of behind the scenes work done by Puffin, including chopping down trees (so many) and clearing the guttering, repairing the back lawn and being generally awesome to name a few.
Go Puffin go!
Still to go:
Concreting of this driveway area, an area for our pillars, and a section out the back from the plumbing repairs earlier this year
This bit.
Adding edging for the division between our lawn and the 'footpath'
Edging for a garden bed on the right of the yard - some formal camellias being the order of the day.
Fare-welling the yukkas and stones in favor of some nice low hedging at the front of the house.
And of course laying and nurturing the new lawn!
Then there are the bigger bits, new stairs, new pillars, painting of the trims, change of guttering and painting the roof - all mixed with engagement planning! Fun fun and we can't wait to share our experiences!
Love, P&S (and Bowie)
Thursday 4 September 2014
How I lost 10 kilograms in 3 days!
Oh I bet you're champing at the bit to hear this gem. The answer was Glandular fever and a hospitalisation where my throat closed over and I couldn't swallow. It was way back in 2006, but I nearly did it again a few months ago. Want to know how? Food poisoning.
Anyway. I just thought I would share those helpful tips.
We've been a bit slack here with updates on Squirrel & Puffin, but things have been pretty crazy... uni, placement, part time work... most weeks this is 6 days a week, and sometimes... 7 days. Blegh. And sometimes people (just general people, no-one I work with, more the people you deal with!) are just so mean or rude and it's so disheartening! And then Puffin had one of his front teeth ripped out and now he has to wear a plate with three fake teeth on it until he gets implants! So much dental, so much wow! But anyway! About a month or so ago, our good friend Mitchy gave us a few days of his time and made us some fabulous garden boxes for our pear trees!


And finally, the finished product! We love Mitchy, he is a clever bugger and we are lucky to have such an awesome mate. We're going to enlist him again as part of the 6 month plan, to build the frame for our pillars, and also to make some new steps for us, to match the garden boxes. We're also thinking of adding another thing to the front yard... some extra concrete to make the driveway better for two cars. At the moment, my little blue beast there has to trample over the last corner of grass. We're also considering starting fresh with the grass, and borrowing Dad's rotary hoe to dig it all up and begin again. But we will see. We can't wait for the weather to warm up and the outside work to begin!
What do you think bloggers. are we on our way to a better looking front of house?
Anyway. I just thought I would share those helpful tips.
We've been a bit slack here with updates on Squirrel & Puffin, but things have been pretty crazy... uni, placement, part time work... most weeks this is 6 days a week, and sometimes... 7 days. Blegh. And sometimes people (just general people, no-one I work with, more the people you deal with!) are just so mean or rude and it's so disheartening! And then Puffin had one of his front teeth ripped out and now he has to wear a plate with three fake teeth on it until he gets implants! So much dental, so much wow! But anyway! About a month or so ago, our good friend Mitchy gave us a few days of his time and made us some fabulous garden boxes for our pear trees!
So our magnificent house, resplendent with pear trees but no garden boxes....
And since we weren't home when Mitch was kind enough to make these for us, some progress shots of how Puffin oiled these bad boys up, and how they came up.
And finally, the finished product! We love Mitchy, he is a clever bugger and we are lucky to have such an awesome mate. We're going to enlist him again as part of the 6 month plan, to build the frame for our pillars, and also to make some new steps for us, to match the garden boxes. We're also thinking of adding another thing to the front yard... some extra concrete to make the driveway better for two cars. At the moment, my little blue beast there has to trample over the last corner of grass. We're also considering starting fresh with the grass, and borrowing Dad's rotary hoe to dig it all up and begin again. But we will see. We can't wait for the weather to warm up and the outside work to begin!
What do you think bloggers. are we on our way to a better looking front of house?
Monday 28 July 2014
Shakes All Over Like A Jelly Fish - The Six Month Plan
Updated October 2014
Do you love a to-do list bloggers? We do. How about reading other peoples to-do lists? Not so much? Well tough, we're about to list ours for the next 6 months.
Complete the last semester of the final year of a Health Science - Public Health degree!! (Done, 28/10/14)
Get through placement (which is taking place in the State government...fancy!) (Done 8/10/14)
Start applying for full time jobs.
Arrange the possibility of a second Pub Clinic, in Melbourne, to tie in with Movember. (Made the decision to not be involved! Too much others stuff on!)


Do you love a to-do list bloggers? We do. How about reading other peoples to-do lists? Not so much? Well tough, we're about to list ours for the next 6 months.
Squirrel
Start applying for full time jobs.
Try very hard not to cry about how much is going on. I haven't cried in over two months, not even when I wrote my car off!
Remember her all time favorite inspirational quote "It always seems impossible until it's done" from the great man, Nelson Mandela. I don't usually go in for inspirational quotes; often they are by someone who I do not find inspirational (Marilyn Munro anyone?) or anyone who is famous simply for being attractive. I mean how strange is it that as a society we are expected to admire people on their attractiveness alone? Off topic: last week I read both a glossy men and womens magazine, both had lists of inspirational people for the year. The womens magazine listed a bunch of supermodels who were rich. The mens magazine had genuinely interesting people who do things other than being attractive, eg George Clooney. It's sad. Women are encouraged to believe that attractiveness is the be all and end all. I'd much rather be interesting and capable than pretty. But there you go.
Puffin
Continue along the path of braces, another tooth removal, and implants. It would be really good if these could be finalised by the end of the year but at the end of the day, what really needs to happen is for things to be done right this time, so we don't have to have any work done again.
Maintain the veggie patches, which are coming along pretty well!
Squirrel&Puffin
Continue work on the front of the house and associated landscaping, as outlined in this blog post.This weekend just gone in fact, we sourced another quote for the stacked stone, and got a sample to have a look at next to our bricks.
This will require the assistance of probably Badger and Mitchy, who will help us to bring the facade of our house into the new millennium.
Clean out the garage and hold a garage sale.
Make plans for 2015. We really want to travel back to the UK and Europe, but suspect that we might be heading in 2016. This is rather dependent on Squirrels job situation.
And that's pretty much it, apart from the odd small project here and there. What's on your lists bloggers?
Sunday 27 July 2014
I walked right out of the machinery
You know what I love? DEMIJOHNS! And/or Carboys! Which are the giant glass bottles I have been hankering after!

If you see one of these lying around, in sea-glass green (not green green) PLEASE BUY IT FOR ME! It's got to be like, the size of two big human heads. Really big. And round, as per above! And Meerkat got me one in Daylesford!! Looooooook!

Demijohn!!!!!
Anyway.
A couple of months ago I was driving with the Badger and Meerkat through Richmond after an Ikea trip and my eye was caught by the most beautiful geometric chest of drawers. Through the marvel that is the internet, I searched for the shop name, saw that they sold online, and found the unit...ta-da!

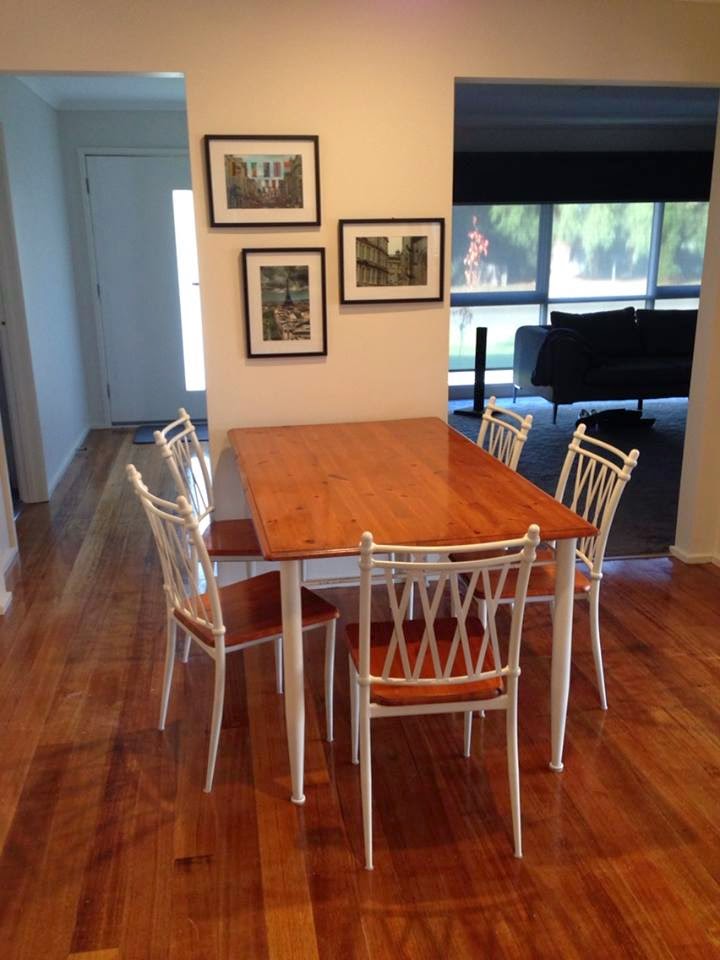
From The Family Love Tree, for the bargain price of ...$1995. Yep, ouch. I also do not need a chest of drawers. But soooo pretty! So, what is there to do but put our own twist on this, on a different piece of furniture? Our table and chairs, which have been partially renovated still need a bit of colour - at the moment its a wood table on wood floors and, well, you don't want too much wood. Just ask Tiger. So, I drew up some plans. On paint. This is what I ended up with.

Now I never said this was my strong suite. I'm good at doing, not at drawing up, when it comes to renovations. I mean, I can plan like a general, but designing by hand, nup. I'm out. The brown is the bits I'm leaving as wood.


This was a photo of the mid way point - it looks awesome from here but a bit closer and you can see the bleed in the lines. To fix this, I hit it lightly with the mouse sander, then taped these colours off and re-hit them with the foam roller. This helped especially with the yellow, as it's coverage wasn't great after the first two coats. But that's yellow for you! The coverage of a crocheted bikini!!


So, the before!
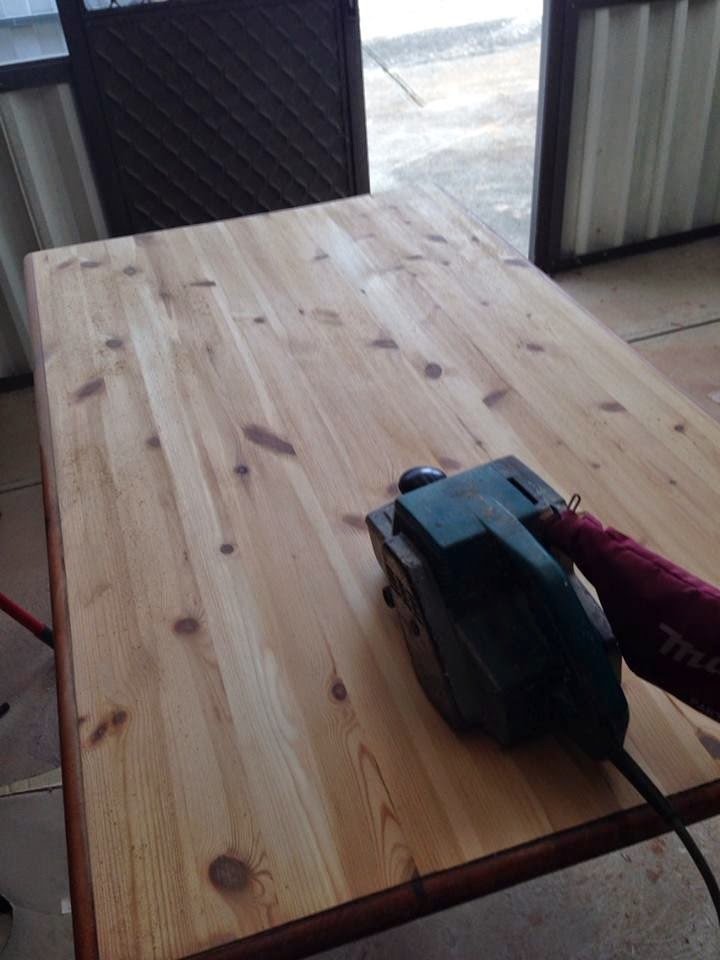
The first step - removing the orange varnish. I began this with the orbital, but after getting only about 3 inches done (in 10 minutes!), it (temporarily) died on me! Then I used Badgers, since he was around for the day working on our doors - Thanks again Badger! - but this wasn't making a lot of head way either, and the belt sander was beckoning. After what seemed like 4 minutes later, the table was sanded! Thanks belt sander!
Badger then took the rounded edges off with the circular saw - I forgot to take photos of this bit! But I love how much more modern the lines of the table are now!
Then it was time for maths! I divided up the table with a pencil and ruler, and then set about numbering it...
...and the paint chips, like so. An epic version of paint by numbers!
The first way I attempted this was by doing each colour individually. As I went to bed that night though, I started to worry that the three strips of triangles wouldn't match nicely if I continued in this way.
So the next day, I taped off the two long edges, and half of the triangles. I then rolled these on. Here was my second and third mistakes. Second - not pushing the tape down enough, leading to some bleeding. Third - switching to a nap roller instead of sponge. I used sponge on the first day and it went on beautifully but I had a bit of a brain fart and forgot how to wash it properly. After applying the yellow, green and a blue with a nap roller and seeing it was leaving a bit of build up, I remembered how to clean the foam one, and switched back.
Note: it was about here that I locked myself out of the house, couldn't break in, and had to walk to the house of Badger and Mumma Bear to await Badgers homecoming to break in through the roof. Who's having a good run? This girl.
I then got back into the swing of things by taping off the alternative triangles on the edges, and painting these.
With this being the result. You can see my furry helper here. The weather was good so on this day I was able to tape off the middle section and get another bit done.
I then re-did the teal areas, where the bleed from the thick nap had made a small mess, and re-did some of the yellow again. I also took the orbital to the edges to give us our clean lines. Next, Puffin carried the table into the weather-proof environment of the shed (did you guys know we had a shed? I forget we do half of the time!) and I rolled on a coat of acrylic gloss varnish. According to the internet, acrylic goes best over water based (for what are probably obvious reasons to those of you who play with paint) and for anyone who has had the misfortune of having to use anything oil based, it's also easier to clean etc but it ALSO will, apparently, not make the timber go that yellow-y colour. Huzzuh.
I added another gloss coat the day after and finally, it was time to come back inside - the final final product, in it's place!
Before & After!
And that's it! I think that the triangles on the chairs AND the table make it look a bit busy, so down the track we might replace the chairs with some that match our bar stools, like these...
Maybe a mix of white and yellow chairs? We'll see. These are $59.00 each at Milan Direct. I might also swap the chair legs our at some point for some sexy chrome ones, if I see some that I like the look of.
What do you think bloggers? This project took over two months but if you had a solid week off you could knock something similar out in no time. My challenge was our weekends away (Hepburn and Tassie) and working just about every other day unless I had something on! But lo and behold on the final day of university holidays, it is complete!
Another post is going straight up later tonight, so keep your eyes peeled for Squirrel and Puffin updates!
Subscribe to:
Posts (Atom)